I am writing this guide on how to build docker image to create a Docker image from scratch and show you how to deploy and run your application as a Docker container using a Docker file.
For beginners, it is important to understand what Docker is and why it’s so essential in today’s development world.
Docker is a powerful tool that simplifies the way we package, deploy, and run applications within lightweight containers. Let me tell you why GSTs.s
The idea of packaging applications in containers is something that has traditionally been going on. But Docker has made it incredibly user-friendly for beginners.
Many organizations are using Docker in their projects, and you must know about this so that you will be able to work in the organization that you are rooting for.
In this post, I will talk about the knowledge and skills to build a docker image from a docker file like a pro. You’ll learn how to write a Dockerfile and publish Docker images with confidence.
Let’s not waste any more time and dive into the guide ASAP!!!
Unlock exclusive savings with Greengeeks Coupon codes! Get discounts on eco-friendly web hosting plans and take your website to new heights sustainably.
What is Dockerfile in Docker?
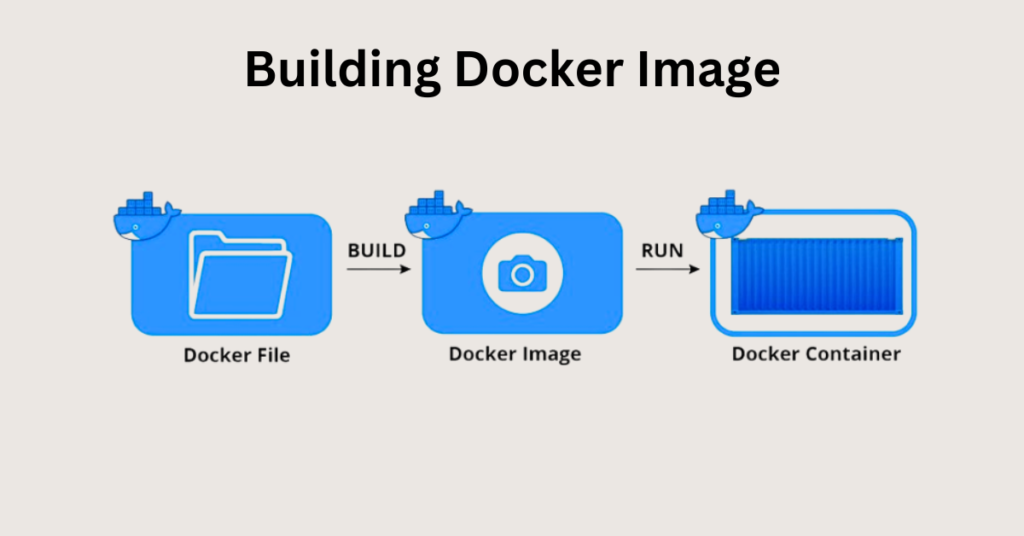
Wondering what the Docker file is? The Dockerfile in Docker is the fundamental element for creating an image. It is like a simple text recipe that tells Docker how to build a docker image.
It’s just a plain text file containing a set of instructions and their associated arguments. When Docker reads this file, it automatically creates images based on the instructions you provide.
I put the step-by-step instructions on the left side of a Dockerfile. These instructions tell Docker what to do, like installing software or setting up configurations.
On the right side, I get the arguments, which are the specific details or options I have provided for each instruction. It is like the software version or file paths.
One thing to keep in mind is that the filename of this text file must be “Dockerfile,” and it shouldn’t have any file extensions.
A Dockerfile is your recipe for building a Docker image. It’s where I specify all the necessary ingredients and steps to create a docker image that suits my needs.
If your Dockerfile is well-crafted, you can automate the image creation process and ensure that your application runs smoothly within a Docker container.
Also, because container systems like Kubernetes are always changing, it’s important to address the “How do I set up monitoring in Kubernetes“. This helps you keep track of how well your applications are doing and fix any problems that come up.
Below, I am mentioning some of the most important Dockerfile instructions along with their explanations:
FROM:
I started building my Docker image by choosing a base image from a collection of pre-made images.
Think of it as picking a foundation for a new house.
RUN:
I can make changes to my image by giving it a to-do list of commands.
These commands will be carried out as I build the image.
It’s like adding ingredients to a recipe.
ENV:
I can set up special notes (environment variables) that stick around inside my image.
These notes can be useful while I’m building the image and when I run the container later.
COPY:
I can copy files and folders from my computer into the image, like moving files into a box.
This is how I add my application and configuration to the image.
EXPOSE:
I tell Docker which ports my container will use to communicate with the outside world.
It’s like opening doors in my container so that others can talk to it.
ADD:
Similar to copying, I can also fetch files from the internet and unpack them automatically.
But it’s often better to use ‘COPY’ for clarity.
WORKDIR:
I decided on the main working folder inside my image.
This is like setting the central workspace.
It helps me stay organized and run future commands from the right place.
VOLUME:
I create a special storage area within my container.
It’s like having a secret drawer where I can store important stuff that won’t disappear when I stop the container.
USER:
I can choose who I want to be inside the container.
This is for security.
I can be a regular user instead of a powerful “root” user.
LABEL:
I add labels to my image, which are like sticky notes with extra information.
They tell others things like who created the image and what version it is.
ARG:
I can create special notes for building my image, like writing reminders on a whiteboard.
These notes are only used during the image-building process and aren’t available when the container is running.
CMD:
I decide what the container should do as soon as it starts.
It’s like telling it the first thing to do when it wakes up.
ENTRYPOINT:
This is the initial command the container runs when it starts.
I can think of it as the container’s “starting point.”
These were instructions that helped me put together a Docker container by specifying how it’s built and what it does when it’s running.
How to Build Docker Image from Scratch?
To create a docker image from scratch, you have to follow the provided instructions, including the step Docker build from Dockerfile example.
Along with the instruction, I will also be providing a real-world example for better understanding. Let’s start to create an Nginx docker image from scratch with a custom index page.
Setting up these variables is really important because it helps you get a grip on containerization tricks. You can learn more about this in a complete CKA study guide.
Step 1: Create the Required Files and Folders
- First of all, you have to create a folder named devops-operator and create another folder named files
Create the ‘devops-operator‘ folder:
mkdir devops-operatorNavigate into the ‘devops-operator’ folder:
cd devops-operator
Create the files folder inside ‘devops-operator’:
mkdir filesStep 2: Create a Sample HTML File and Config File
Let me tell you that while building a docker image for real-time projects will need code or application config files.
Researching and sourcing the right code snippets is easier when you find the best coding websites. I am going to start with creating an easy HTML file & config file as my app code and package it using Docker.
It is going to be a simple index.html file. If you are willing to create your own, then you can go with that.
1. Create a Sample HTML File (index.html):
You can create the HTML file using a text editor like nano:
nano index.htmlInside the text editor, you can add your HTML content. Here’s a simple example:
<!DOCTYPE html>
<html lang="en">
<head>
    <meta charset="UTF-8">
    <meta name="viewport" content="width=device-width, initial-scale=1.0">
    <title>Sample HTML Page</title>
</head>
<body>
    <h1>Hello, Docker!</h1>
    <p>This is a sample HTML file.</p>
</body>
</html>
Save the file and exit the text editor.
2. Create a Sample Configuration File (config.ini):
Similarly, create the configuration file using a text editor:
nano config.ini
Inside the text editor, define your configuration settings. Here’s an example of a simple configuration file in INI format:
[App]
name = SampleApp
version = 1.0
environment = development

[Database]
host = localhost
port = 3306
username = root
password = password123
Save the file and exit the text editor.
You’ve made a sample HTML file called index.html and a configuration file named config.ini. These files hold the code and settings for your app. Now, you can use Docker to wrap them up into a package according to what you need.
- Move to the default file using the below command:
cd ~
Step 3: Choose a Base Image
When I’m creating a Docker image using a Dockerfile, I use the “FROM” command to tell Docker to make an image based on another image available on Docker Hub or a similar container registry.
This initial image is often called a “base image.” It’s a bit like how I create virtual machines in the cloud by starting from a pre-made virtual machine image.
The choice of the base image depends on my application and the operating system I want to use. In my case, I’m going to pick the “ubuntu:18.04” base image.
It’s important to be cautious about which base image I choose. I should prefer using official or organization-approved base images for my applications to avoid potential security issues.
Toward the end of my Dockerfile, I can add references to public registries that contain verified base images.
Especially for production use, it’s a good idea to select a minimal base image like “alpine,” which is only about 5 megabytes in size, or even a smaller one like “distroless,” which is just 2 megabytes.
This helps keep my Docker image lightweight and more secure.
Step 4: Create the Dockerfile
As the fourth step, I will create a Dockerfile in the devops-operator folder:
cd devops-operator
The Dockerfile content is ready for use. Now, I will go on with adding the content to the Dockerfile:
# Use an existing docker image as a base
FROM ubuntu:latest

# Install necessary packages
RUN apt-get update && \
    apt-get install -y python3

# Set the working directory
WORKDIR /app

# Copy the application files into the image
COPY . /app

# Expose port 8080
EXPOSE 8080

# Define the default command to run when the container starts
CMD ["python3", "app.py"]
Let me break down each step for you:
- First, I use the LABEL instruction to add some information about myself as the maintainer of this Docker image, although this step is not mandatory.
- Next, I use the FROM instruction to pull in the Ubuntu 18.04 version image from Docker Hub as the starting point for my image.
- In the second line, I install Nginx inside my Docker image.
- Then, I copy the default Nginx configuration file from my local files directory to the appropriate location in the image.
- Following that, I copy my own “index.html” file from my local files directory into the image. This overwrites the default “index.html” file that Nginx sets up during installation.
- I expose port 80 because Nginx listens on that port, and I want it to be accessible.
- Finally, when I launch the Docker image, I run the Nginx server using the CMD instruction.
Python for DevOps also comes in handy when managing processes like Nginx within containers.
This keeps the Nginx process running in the foreground inside the container, meaning it won’t stop until I stop the container.
This behavior is achieved by using the “daemon off;” directive, which prevents Nginx from running in the background. The “-g” option allows me to specify directives for Nginx.
The reason for running Nginx in the foreground is so I can see the logs and messages from the Nginx process.
It lets me attach the console process to standard input, output, and error, which makes it easier to monitor what’s happening.
Step 5: Build Your First Docker Image
If you will take a look at the final folder & file structure, they should look like this only:
devops-operator

├── Dockerfile

└── files

    ├── default

└── index.html- Then, I will build the image using the Docker command.
- Use the following command, to build the image using Dockerfile from the same directory.
docker build -t devops-operator1.0
Where,
- -t is for tagging the image.
- nginx is the name of the image.
- 1.0 is the tag name.
- . (dot) refers to the Dockerfile location as the Docker build context.
- You need to follow the Run Docker image command if the Dockerfile is in another folder:
docker build -t devops-operator/path/to/folder- Listing images by running the below command:
docker images- The tag is shown as 1.0.
- To put a specific tag name, use image-name:<tag>.
docker build -t devops-operator:2.0 In case of no specified tag, the default will be the latest tag:
A single image can have multiple tags.
There are two ways I can tag images:
Stable Tags
I can stick with one tag that doesn’t change. It keeps getting updates, but the tag always stays the same, even when the image content changes.
Unique Tags
I can use a different and special tag for each image. I have various options to create unique tags, like using the date and time, build number, or commit ID.
Docker helps me by saving the steps when I build an image. This means if I build the image again, it’ll be a bit quicker.
For instance, I won’t need to download the Ubuntu 18.04 image all over again.
It’s important to note that using large images can make the building and deployment of containers slower.
If I want to find out more about making Docker images work better, I can take a look at a guide on reducing Docker image size.
Step 6: Test the Docker Image
To run the Docker image, run the following command:
docker run -p host_port:container_port devops-operator
Where,
- -d flag is for running the container in detached mode
- -p flag for the port number, the format is local-port:container-port
- –name for the container name, the web server in our case
Run the following command to check the container:
docker psVisit http://<host-ip>:9090 to check the index page. It shows the content in the custom HTML page that I have added to the docker image.
Push Docker Image To Docker Hub
I am mentioning the easiest way to push the docker image to the docker hub. Follow the given instructions to do the same:
- First thing first, create a Docker Hub Account. Begin by signing up for a Docker Hub account on their website.
- Now, you have to log in to Docker Hub. Open your terminal and execute the following command:
docker login- You will be prompted to enter your Docker Hub username and password. Provide the credentials associated with your Docker Hub account.
- It’s time to tag your image. To push your image, it needs to be tagged with your Docker Hub username. Tagging is important because it helps Docker recognize where to send your image.
For example, you can use the following Docker build example to create and tag your image before pushing it to Docker Hub:
docker tag devops-operator:1.0 <username>/<image-name>:tag- Replace <username> with your Docker Hub username and <image-name> with the desired name for your image. Here’s an example:
docker tag devops-operator:1.0 devopsoperator/nginx:1.0- After tagging, you can confirm the changes by running the docker images command.
- Time to Push the Image. To upload your image to the Docker Hub, use this command:
docker push <username>/<image-name>:tag- Replace <username> and <image-name> with your Docker Hub username and the image name you used in the previous step. For instance:
docker push devopsoperator/repository_name:tagDocker will begin the upload process. The time it takes depends on the image’s size and your internet connection.
Once the upload is complete, go to your Docker Hub account. You will find your image listed, ready for you and others to access and use.
Now, you have successfully shared your Docker image on the Docker Hub, making it available for the Docker community.
Docker Image vs. Containers
Previously, I have mentioned several things about Docker Image. Now, I am going to mention the main differences between Docker Image and Container.
The main difference is that Docker images are like templates, and Docker containers are instances created from those templates, with their own unique data.
Let’s take a look at some other important points for the same.
| DOCKER IMAGES | DOCKER CONTAINERS |
| It’s like a snapshot of everything that is needed to run a program. It includes the code, tools, and files. | It’s like an instance created from a Docker image, similar to how you make a meal from a recipe. |
| I’m made up of read-only layers stacked on top of each other, like building blocks. | It adds a writable layer on top of the image’s read-only layers, where it makes changes and stores my unique data. |
| It is a complete package, like a recipe for making your favorite dish. | It’s like a filled-out form based on that image. |
| It exists independently, even if there are no containers using me. | Multiple containers can be made from the same image, but each has its own writable layer, meaning they can hold different information. |
| After deleting, the image will be gone. | After deleting, the unique writable layer goes away, but the image stays the same for others to use. |
Conclusion
Hopefully, now you know how to create a docker image along with other necessary information. I have talked about the docker file and how it is used in creating the docker image.
I have also mentioned the step-by-step guide to create your own docker image.
Besides all these things, I provided a clear contrast between docker images and containers for better understanding. Now, you can go on with creating your docker image.
References:
- https://community.soundcore.com/t/masterclass-coupon-discount-code-2024-save-10-now/9421083
- https://skillsharecouponcode.weebly.com/
- https://chodilinh.com/threads/skillshare-discount-code.262077/
- https://skillshare-coupon-code.hashnode.dev/exclusive-skillshare-discount-code-for-2024
- https://medium.com/@keertiumesh25/latest-skillshare-discount-codes-for-2024-85847db48336
- https://seo-powersuite-coupons.weebly.com/
- https://www.geocities.ws/seopowersuitecouponcode/
- https://hackmd.io/@nzjow69/seo-powersuite-discount
- https://medium.com/@keertiumesh25/seo-powersuite-discount-2024-save-up-to-34-a784c918cd64
- https://web-hosting-coupon.hashnode.dev/seo-powersuite-discount
- https://community.soundcore.com/t/seo-powersuite-discount-coupons-2024-save-297/9409286
- https://seo-powersuite-oupon.mystrikingly.com/
- https://narede.clicrbs.com.br/articles/seo-powersuite-coupon-code-2024
- https://start.me/p/zpa6zM
- https://edx-coupon-code.weebly.com/
- https://www.geocities.ws/edx-coupon-code/
- https://anil.podia.com/edx-free-trial
- https://web-hosting-coupon.hashnode.dev/edx-coupon-codes
- https://gravatar.com/edxpromocode
- https://start.me/p/80vLGa/edx-coupons
- https://edx-review.bandcamp.com/album/edx-review-what-is-edx-is-edx-legit-2024
- https://x.com/ijasonwalker/status/1801245686786130127
- https://pin.it/7fdTB03Vf
- https://gravatar.com/teachablecouponcode?utm_source=share_profile
- https://medium.com/@keertiumesh25/teachable-coupon-code-2024-84c4324861a2
- https://community.soundcore.com/t/jungle-scout-discount-code-2024-claim-80-off-now/9409342
- https://gitlab.aicrowd.com/-/snippets/188553
- https://web-hosting-coupon.hashnode.dev/oceanwp-free-trial
- https://anil.podia.com/hello-theme-vs-oceanwp
- https://oceanwp-theme-review.weebly.com/
- https://linktr.ee/oceanwp_coupons
- https://web-hosting-coupon.hashnode.dev/oceanwp-coupon-code
- https://community.soundcore.com/t/oceanwp-coupon-codes-discounts-get-50-off-2024/9409285
- https://pressable-coupons.hashnode.dev/pressable-review
- https://pressable-pricing.weebly.com/
- https://community.soundcore.com/t/pressable-coupon-code-50-off-promo-codes-march-2024/9416076
- https://pressable-vs-wpengine.mystrikingly.com/
- https://web-hosting-coupons.bandcamp.com/album/pressable-coupon-code
- https://start.me/p/BPNkvv/pressable-coupon-code
- https://anil.podia.com/pressable-vs-touchableopacity
- https://gitlab.aicrowd.com/-/snippets/182020
- https://www.geocities.ws/kodekloud-coupon-codes/
- https://kodekloud-coupon-code.weebly.com/
- https://twitter.com/KeertiUmesh/status/1790766579078099125
- https://web-hosting-coupon.hashnode.dev/kodekloud-coupons
- https://community.soundcore.com/t/kodekloud-coupons-promo-codes-march-2024-save-45-now/9406334
- https://www.geocities.ws/dreamhost-pricing/
- https://gitlab.aicrowd.com/-/snippets/149613
- https://web-hosting-coupon.hashnode.dev/dreamhost-coupons
- https://anil.podia.com/dreamhost-affiliate-program
- https://web-hosting-coupons.bandcamp.com/album/dreamhost-review-2024
- https://dreamhost-free-trial.mystrikingly.com/
- https://web-hosting-coupon.hashnode.dev/bluehost-free-trial
- https://community.soundcore.com/t/bluehost-free-trial-2024-get-hosting-for-30-days-at-zero/9411832
- https://anil.podia.com/whizlabs-review
- https://gitlab.aicrowd.com/-/snippets/184026
- https://heylink.me/whizlabscoupons/
- https://web-hosting-coupon.hashnode.dev/whizlabs-coupon
- https://whizlabs-student-discount.mystrikingly.com/
- https://web-hosting-coupons.bandcamp.com/album/whizlabs-discount-code-2024
- https://www.ticketleap.events/tickets/whizlabs-coupon-code/discounts
- https://start.me/p/Mb8dvR/whizlabs-promo-code-2024
- https://msnho.com/blog/wp-engine-pricing-plans-2024-it-really-worth-its-price
- https://gitlab.aicrowd.com/-/snippets/185301
- https://web-hosting-coupon.hashnode.dev/wp-engine-coupons
- https://community.soundcore.com/t/wp-engine-coupons-promo-codes-get-50-off-today-2024/9412022
- https://anil.podia.com/wp-engine-free-trial
- https://narede.clicrbs.com.br/articles/wp-engine-review-2024-is-it-worth-the-cost
- https://wpengine-pricing-plans.mystrikingly.com/
- https://web-hosting-coupons.bandcamp.com/album/wp-engine-free-trial
- https://web-hosting-coupon.hashnode.dev/liquid-web-coupon
- https://anil.podia.com/liquid-web-pricing
- https://gitlab.aicrowd.com/-/snippets/192116
- https://medium.com/@anil.27788/liquid-web-affiliate-program-earn-150-or-more-2024-30b80c25bfac
- https://liquidweb-black-friday.weebly.com/
- https://www.geocities.ws/liquid-web-vs-aws/
- https://liquid-web-vs-vps.mystrikingly.com/
- https://start.me/p/5kyaR0/liquid-web-review-2024
- https://web-hosting-coupons.bandcamp.com/album/liquid-web-pricing-2024
- https://web-hosting-coupon.hashnode.dev/datacamp-coupons
- https://datacamp-student-discount.weebly.com/
- https://www.geocities.ws/datacamp-free-trial/
- https://medium.com/@anil.27788/datacamp-pricing-is-a-datacamp-subscription-worth-it-b541db2e2db5
- https://heylink.me/Datacamp-Coupons
- https://anil.podia.com/datacamp-review
- https://narede.clicrbs.com.br/articles/datacamp-vs-udemy-which-one-is-better
- https://datacamp-free-trial.mystrikingly.com/
- https://web-hosting-coupons.bandcamp.com/album/datacamp-student-discount
- https://medium.com/@anil.27788/appsumo-plus-discount-code-get-29-off-coupon-70d8492dd143
- https://www.geocities.ws/appsumo-student-discounts/
- https://anil.podia.com/appsumo-coupon-code
- https://linktr.ee/appsumo_coupons
- https://community.soundcore.com/t/appsumo-discount-coupon-2024-save-10-with-5-deals/9409222
- https://www.geocities.ws/udacity-coupons/
- https://anil.podia.com/udacity-discount-code
- https://udacity-coupons.mystrikingly.com/
- https://narede.clicrbs.com.br/articles/udacity-review-is-udacity-worth-the-money
- https://web-hosting-coupons.bandcamp.com/album/udacity-review
- https://start.me/p/zpaPxn/udacity-reviews-2024
- https://gitlab.aicrowd.com/-/snippets/187656
- https://medium.com/@anil.27788/pluralsight-pricing-how-much-does-pluralsight-cost-2024-320131c4bd1d
- https://www.geocities.ws/pluralsight-vs-coursera/
- https://linktr.ee/pluralsight_coupon_codes
- https://anil.podia.com/pluralsight-free-trial
- https://hackmd.io/@nzjow69/pluralsight-discount-coupon
- https://pluralsight-student-discount.mystrikingly.com/
- https://www.ticketleap.events/tickets/pluralsights/pluralsight-coupons
- https://pluralsight.bandcamp.com/album/pluralsight-coupons-2024-get-63-discount-code
- https://start.me/p/DaElpz/start-page
- https://narede.clicrbs.com.br/articles/pluralsight-coupons-2024-75-discount
- https://sketchfab.com/3d-models/pluralsight-coupon-code-2024-get-upto-70-off-fbe50fb401474fdc92e1cda384a14f70
- https://linktr.ee/pluralsight_coupon
- https://anil.podia.com/nexcess-reviews
- https://medium.com/@anil.27788/nexcess-vs-liquid-web-where-to-host-your-site-aa6b3766b1c4
- https://nexcess-vs-cloudways.weebly.com/
- https://www.geocities.ws/nexcess-vs-bluehost/
- https://linktr.ee/nexcess_coupon_codes
- https://nexcess-pricing.mystrikingly.com/
- https://nexcessreview.bandcamp.com/album/nexcess-reviews-is-it-worth-it
- https://start.me/p/mwXQRY/nexcess-vs-liquid-web
- https://narede.clicrbs.com.br/articles/mindvalley-discount-coupons
- https://medium.com/@upwritez/mindvalley-discount-code-2024-100-off-coupon-01d7418f8cb9
- https://start.me/p/QLMa2O/mindvalley-discounts
- https://jason57.podia.com/mindvalley-discount-code
- https://www.geocities.ws/mindvalley-discount-promo/
- https://mindvalley-coupon.bandcamp.com/album/mindvalley-coupons-2024-get-latest-88-discount
- https://medium.com/@anil.27788/mindvalley-coupons-flat-40-off-june-2024-cf38c05b3f6b
- https://www.geocities.ws/mindvalley-free-trial/
- https://mindvalleyvsmasterclass.bandcamp.com/album/mindvalley-vs-masterclass-comparison-guide-for-2024
- https://www.artstation.com/williamjones2357u/profile
- https://linktr.ee/mindvalley_discount
- https://www.storeboard.com/mindvalleydiscountcoupons2024
Frequently Asked Questions
What is the command to build a Docker image?
To build a Docker image, use the following docker build command:docker build -t IMAGE_NAME:TAG PATH_TO_DOCKERFILE_DIRECTORY
Use the format, and enter the names needed at the required places.
How to start a docker image from the command?
To start a docker image from the command, use the following command: docker run [OPTIONS] IMAGE_NAME[:TAG] [COMMAND] [ARG…]
Fill out the proper information required where it is needed to be filled, then you will have the required results.
Can I use base images from container registries other than the Docker hub?
Yes, you can use base images from container registries other than the Docker hub. Let me tell you about the default setting, which shows that the docker engine is configured with the docker hub container registry. Once you write the name of the image, you will get it right away. Other than that, to use an image from a different container registry, use the full URL of the image you want to use.
What is Docker build context?
The “Docker build context” is like a folder on your computer where Docker looks for stuff it needs when making something. This folder has all the code, files, settings, and a special file called Dockerfile. You can tell Docker to look in the current folder by using a dot [.] or you can say which folder to check. Sometimes, the Dockerfile might be in a different folder than the one Docker is looking at. It’s a good idea to only put the things Docker really needs in that folder. If you put too much stuff in there, you’ll end up with extra stuff in your final Docker thing, and it will be bigger than it needs to be.
Can I build a Docker Image from a Git repository?
Yes, you can build a Docker Image from a Git repository. All you have to do is use the docker build command with a git repository to build a docker image. The git repository will definitely have the Dockerfile and other important files to build the image successfully.
